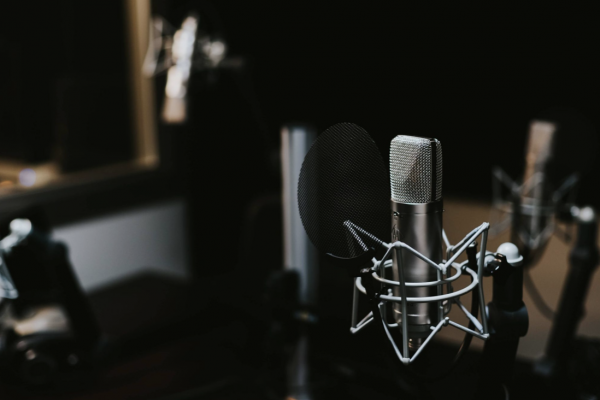
Once you have your podcast plan, it’s time to start thinking about your podcast workflow. This is more than just what gear you need and how you have things set up. If you can think through the best flow of your content, you’ll be able to save time and create efficiencies.
I used to have to load up Adobe Audition, use complicated audio routing software, and record my guest using another web app. Thankfully, with Ecamm Live we don’t need any of that. It’s so much more simple then it used to be.
In this post, we’re going to show you how you can use Ecamm Live to live stream and record for your podcast with ease! We’re going to create the perfect podcast workflow so you can be efficient and successful.
In this post, we’ll cover
- What you need to launch your podcast from a live show
- Software and hardware recommendations
- What not to do
- Example podcast workflow
Watch the full episode
Want to learn even more?
ECAMM LIVE (Free Trial) https://iag.me/ecammlive
IAN’S GEAR GUIDE https://iag.me/gearguide
LIVE VIDEO CONFIDENCE GUIDE (opens with FB Messenger) https://confident.live/subscribe
CONFIDENT LIVE MARKETING SHOW https://iag.me/podcast
Today we’re talking all about how to launch your podcast with live video. I’m going to show you how to do it all with Ecamm Live at the heart of your podcast workflow. Not just because this is content created in partnership with Ecamm, but because it is one of the easiest ways to convert your live show into a podcast. Bonus: Ecamm Live gives you the best quality result.
So other than Ecamm Live, what other tools do you need to launch your podcast from a live show?
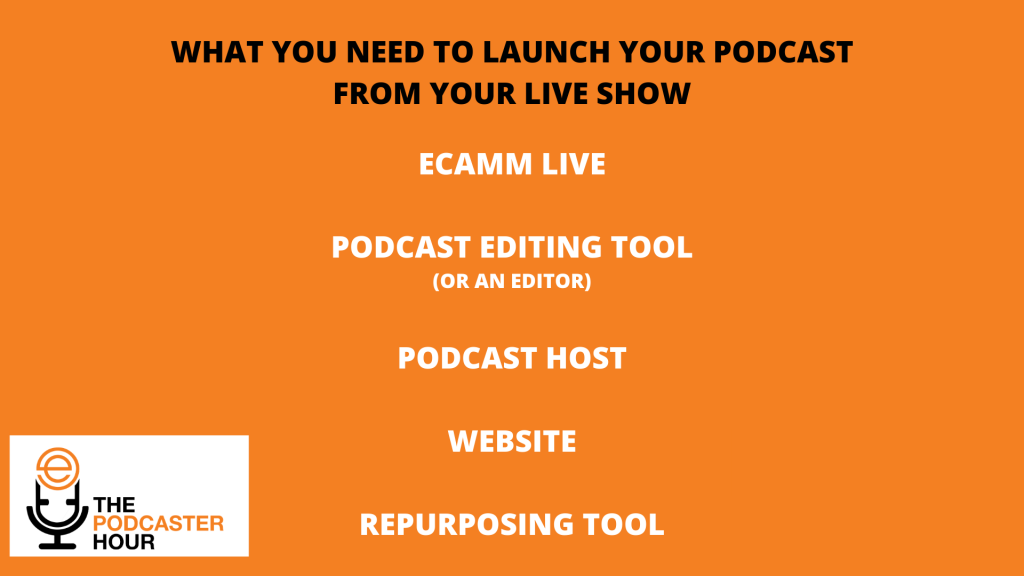
To start, you’ll need a podcasting editing tool. That is, unless you to do the lazy route, which is to just strip the audio out completely and launch that as a podcast. Rather than do that, I would recommend using a podcast editing tool or hiring a podcast editor to help.
The next thing that you need is a podcast host. This is somewhere where your mp3 will sit and also where the podcast feed will be hosted. When you subscribe to a podcast on Apple, Google, or Spotify, you’re actually connecting to a podcast feed that is hosted by the podcast host.
Now, the next thing is optional. You don’t technically need a website. In fact, a lot of podcast hosts these days will actually give you a webpage. That being said, I do think it’s a good idea to have your own domain and website. This is a space where you can put your podcast episodes and more info. You can also encourage people to sign up to your email list, share any updates, and let everyone know how to best subscribe to your live broadcasts.
Finally, you’ll want to consider having a repurposing tool or tools. At the end of the day, you’re going to want to be thinking about how to repurpose all of the amazing content you’re creating.
How I used to turn my live videos into a podcast
Before Ecamm Live’s update, I used to have to have Adobe Audition running in the background to record my audio. I could have done that in Ecamm. However, at the time, if I had just grabbed the audio from Ecamm Live it would have been my audio and my guest’s audio combined. Now, I can use Ecamm Live’s ISO audio feature and I get all of the separate audio tracks saved for me automatically. Easy!
But at the time, I had to record my audio into Adobe Audition. I also had my guests login to another service called Zencaster to record their sound independently on their end. And then I’d have to grab the Zencaster file and put everything into Adobe Audition. Oh and I had to use a complicated software called Loopback. It was so complicated. Thankfully, I don’t need to do that anymore.
There are some other ways that you can get your audio from a live video into into a podcast. One of these ways is to use a tool called repurpose.io. This is a service that allows you to take your Facebook Lives and publish these into a podcast.
With Repurpose, you just connect your Facebook account, your YouTube account, and it will watch out for your live videos. When it sees a live video, it will wait for it to finish and then strip out the audio and send that to your Dropbox or even publish it to your podcast host. It also does the opposite and helps you convert your podcasts to videos. So if you’re wanting a really quick and easy way to repurpose your content, Repurpose.io is a great option. The disadvantage to going this way is that you have no control over your content. You’re basically going to send the whole episode.
What my live streaming and podcast workflow is now
I really like to be able to take the audio and then repurpose that. Maybe I slice the beginning and the end off or put some audio at the beginning or end of the file. I like to tweak things. That means that I need more control so that my content really shines. So I use Ecamm Live and I use their new ISO audio feature. That gives me all of the flexibility to create all of the content that I need and the podcast workflow works for me.
Consider audio branding
One thing you could do is audio branding. In an upcoming post, we’ll talk with Mike Russell of Music Radio Creative all about this. Basically, what you need to do here is think about some audio branding for the beginning or the end of your show. Now this doesn’t have to be music. Audio branding could be you saying welcome to the show, that kind of thing. What you can do is get a voiceover artist to introduce your show for you. Or you could introduce the show for yourself and then convert that into a video. Here’s what that looks like for this show.
So you get the idea from the above example. Basically, it’s some music with a voiceover artist introducing this show. Then I took that audio and I put it into a video editor (like Wave.video or InVideo) and made that into a video file.
Make sure that if you’re doing this, you grab royalty-free audio tracks or pay licensing fees for what you use. You can use a tool called Epidemic Sound, for example. And then you can get a voiceover over the top of that like one of these from Music Radio Creative.
What I love about this tool is that you can choose from their filters. So you can select podcasters and then filter by male or female voices and even choose to have a British accent. And then we can just play these and get an idea of what they sound like. So you could you could do that. Or you could get them to do the whole audio branding for you beginning and end with the music. Like anything else, you can go simple or you can get really creative with it. I do think that audio branding adds a professional touch to your podcast.
Create your show on your podcast host
That brings me on to something that’s really important and that is that you should create the show on your podcast host. My podcast host is Captivate FM, which is a really nice tool, but there are loads of options out there.
So what you’d want to do is go into your podcast host and create a new podcast. It’s going to be a similar process no matter what podcast host you choose. When you first set up your podcast, you’ll have to enter all of the basic information including the title of your podcast, your name and information, images, and more.
You’ll also have to make important choices like whether you’re going to go for episodic (with seasons) or serial. We’ll be talking more about this in a future post. Is your show going to have seasons? Or just episodes? Colin Gray is a big fan of seasons. I just do a different topic per episode for my podcast, which is a serial format. So you just need to think about it. Do you want to break it up into seasons of say, 10 episodes, 20 episodes, and then have a break and then come back to it? Or do you just want to keep going? I’m personally I’m a fan of doing it in a serial format. That said, episodic formats are becoming much more much more popular these days.
Next you’ll need to think about whether or not your podcast will include explicit language? So it really again, depends on your podcast, if at all possible, make it clean? Primarily because it just means that it’s going to affect your reach. Then you won’t be hindered by the likes of Apple podcasts. Of course, you can override that option that on a per episode basis.
You’re also going to need to enter your publish time into your podcast host. Okay, so I’ve entered everything into my podcast host and now I have my podcast feed ready to go. Remember, this is just to set up my podcast and not to set up my live streams. So now I can go on to publishing that now. I wouldn’t recommend that yet. What I’d recommend is to upload some episodes first. It’s really easy to publish an episode. You just upload an audio file and hit publish.
Once you’ve done that, you’ll change your cover art for the episode and then submit it to Apple, Spotify, Google, Amazon Music, Stitcher, and quite a few others as well. You can also submit it to PodChaser, which I would highly recommend since it’s the IMDB of podcasts.
Here is the full podcast workflow.
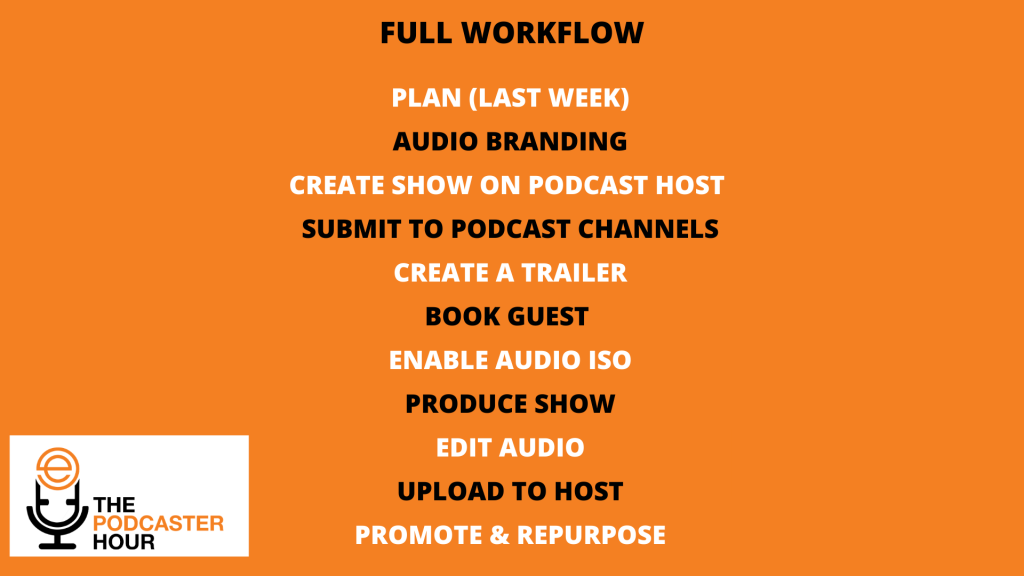
So we’ve already gone through the podcast plan, audio planning, creating the show on the podcast host, and submitting to podcast channels. Now what we need to do in our podcast workflow is create a podcast trailer.
A good podcast trailer should be between two and five minutes long. It will allow your potential listeners to get an idea of what your podcast is going to be about. Again, you may want to have a video format of this as well to use in promotional content.
Next it’ll be time to book a guest (unless it’s a solo show). For guests, I always recommend a tool called Calendly. Calendly makes it really easy for you to book guests right into your calendar automatically. It gives guests all of the information they need to know. This includes things like when, where, what to expect, computer or internet specifications, and more.
For the Confident Live Marketing Show I created a guest checklist. This helps my guests feel prepared for the show. It also helps them keep all of the relevant information in one spot.
I make sure that we meet 15 minutes in advance of the broadcast to do a video and audio check. Before my guest arrives for the show, I always send out the questions I’m going to ask. I ask all of my guests for all of their information. I’m asking for their name, email address, headshot, short bio, website, social links, etc. One thing I always do is ask my guests what they’d like to talk about. I think it’s really important because I want to book my shows in advance. I want them to remember what we’re chatting about. Finally, I include the link to my Ecamm Live interview. This lets people know how to click through to join the show.
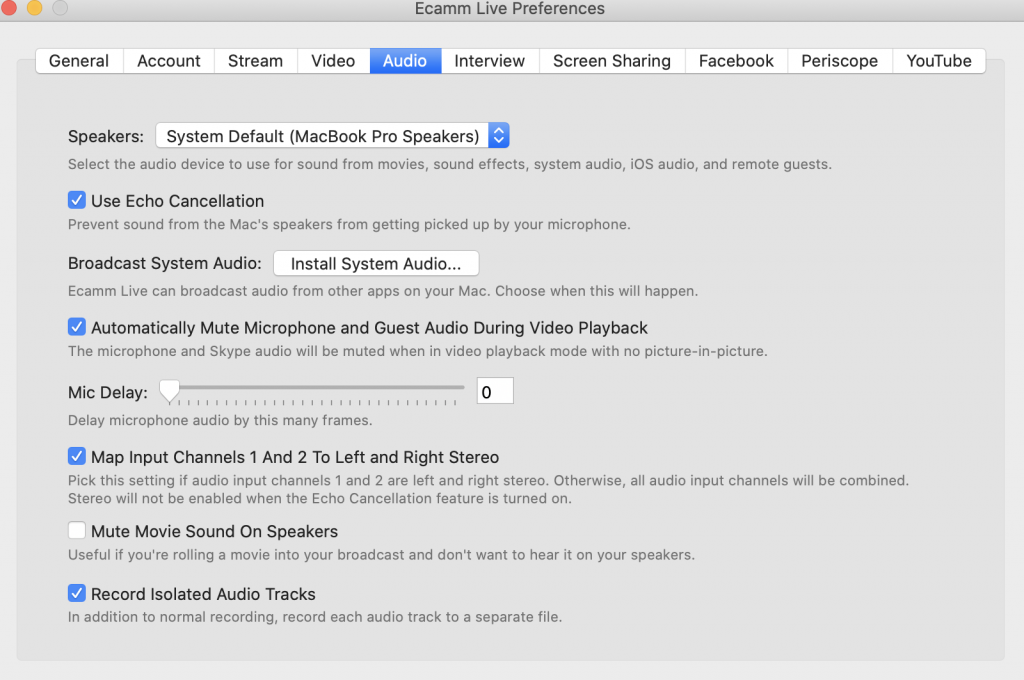
Enable Audio ISO
As I’ve said previously, enabling Audio ISO is really quite easy in Ecamm Live. You just need to go into the Ecamm Live Preferences, select Audio, and check “Record Isolated Audio Tracks.” Here’s what that menu looks like.
From there, you’ll produce your show. In my case, I go live to multiple channels using Ecamm Live and I run my show. Then I edit the audio tracks after the fact and upload the audio into Captivate to release as a podcast.
And then I promote and repurpose.
We’re here to help!
Wherever you are right now, you’re not alone, and we’re here to help. You can watch all episodes of The Podcaster Hour on YouTube and leave us any questions that you have in the comments.
Or…
Join the Ecamm Live Community to network with other live streamers like you, grab Ian’s live streaming and podcasting gear guide, and try out his live video confidence guide.
And if you need another podcast to listen to, may we humbly recommend the Confident Live Marketing Show.