When it comes to Ecamm Live, everyone is coming at it from a different place. Some of you are brand new and just getting started and some are experts in live streaming and in the app itself and know a ton of cool tips and tricks.
No matter how long you’ve been using Ecamm Live, hopefully you’ll have an “aha!” moment with these 5 live streaming tips.
Watch the full episode
Go LIVE Now! is a weekly live video show hosted by Luria Petrucci of LiveStreamingPros.com. You can catch new episodes each week on Facebook and YouTube.
Want to know what gear Luria is using? Check out the full Go LIVE Now! gear guide.
Without further ado, here are 5 tips you need to know to make your live streaming production even easier with Ecamm Live.
Tip #1 – Get Rid of the Skype Logo When Bringing on Guests
If you’ve been using Skype to bring on guests with Ecamm Live, then you’ve likely encountered that annoying Skype logo that appears in one of the corner’s of your guest’s video feed.
Unfortunately, there’s no way to just click and remove the Skype logo, but don’t worry! There is a way to get rid of it.
When you bring your guest on, go over to the Camera Effects menu in Ecamm Live and select your Skype guest as the camera source. Click the checkbox on the “Zoom & Pan” menu and then simply zoom in on your guest and reposition so that the Skype logo is no longer included in the feed.
You can also adjust any picture settings like brightness, temperature, tint, and saturation while you’re at it!
Tip #2 – How to Save a Project File
How do I save my Scenes in Ecamm Live? Can I save my Scenes?
These questions come up a lot among Ecamm Live members and the answer is yes! You can save an Ecamm Live scene. You can also download a Scene onto your computer and send it to any other Ecamm Live member or share it to another computer with Ecamm Live. Instant collaboration!
There are two different ways you can accomplish saving a project file or Scene in Ecamm Live. The first is to create a folder (called a “group” in Ecamm Live) for each show you do. Simply click the little folder at the bottom of the Scenes window and you’ll see a “New Group” folder pop up. Label it accordingly and drag and drop the relevant Scenes into it. Now they’ll be there for you each time you go live.
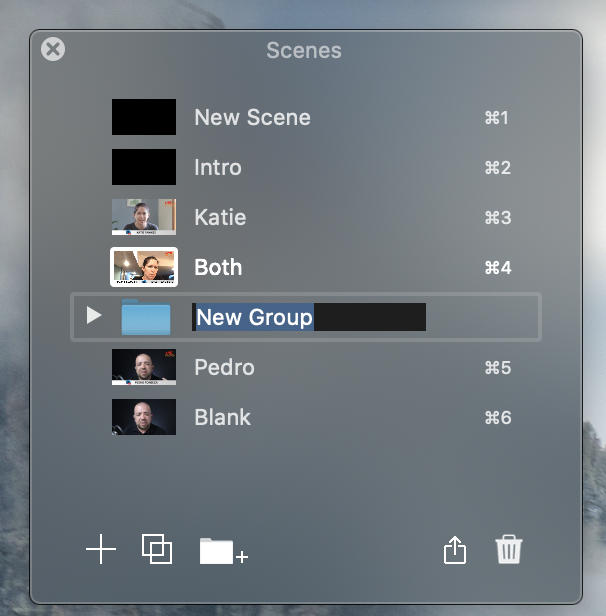
The second way to save a Scene is to click on the “up” arrow at the bottom of the Scenes window (to the left of the garbage can) and export the file to your computer. It’ll save as a .ecammlive file that can be loaded into any Ecamm account. You can either save this on your computer for use later or share with a colleague.
Tip #3 – Set Countdown Timer to .59 to Avoid Position Movements
When you set a countdown timer to an even 10 minutes (or 20 minutes, etc), it will immediately reduce the size and could affect your design when it ticks down to 9:59.
To avoid this and keep the timer looking its best, simply start your timer one second less than your total time (ie: 9:59). If this tip makes ZERO sense to you, simply click on the video below to watch Luria explain it in more detail (and with visuals!)
Tip #4 – Demo Mode
If you’re using Ecamm Live to teach others about live streaming with Ecamm Live, you may use our “Demo Mode.” You may use it often. You may completely forget to go out of demo mode and end up giving your show a different look and feel then you anticipated.
Here’s how to solve that.
Simply add a “demo mode” button to your Elgato Stream Deck. In your Stream Deck, drag over the hot key button and click to assign. Enter the hot key in Ecamm Live that’ll trigger Live Demo Mode (command shift D) and you’ll be good to go.
Remember: you have to be live and using Ecamm Live in order for this Stream Deck button to work.
#5 – Double PiP
How do I get two guests to fit into my pre-designed picture-in-picture, 2-host graphic?
Glad you asked. The first thing to note is that you can’t have your hosts or host/guest positioned anywhere on the screen. They’re going to be stacked on either the right or left hand side, so you’ll want to design your overlay to fit that in advance and then pull it into the applicable Scene in Ecamm Live.
Once you’re ready to go, bring on your guest via Skype. You’ll originally see them come in split screen. Once both you and your guest/co-host are on screen, simply click the Screen Share button in the top middle of the main Ecamm Live window. Once it’s moved to Screen Share mode, then click the picture-in-picture icon on the left hand side of the Screen Screen menu (bottom of the main window).
When your split screen image appears, control click to open the menu and select “Tall” as the aspect ratio. Adjust the size as needed to fit into your existing graphic.
We’re here to help!
Wherever you are right now with your business, you’re not alone and we’re here to help. Go LIVE Now! is a weekly live show on YouTube and Facebook. If you join us live, you can ask your questions at the end of each episode. If there’s a subject you want us to cover, let us know in the comments below.
Want to learn more about Ecamm shows? We have lots of amazing shows to choose from so you can take your live streaming to the next level.
Or…
Join the Ecamm Live Community to network with other live streamers like you.
Snag some free Ecamm Live training with Luria.
Get help from the Live Streaming Pros in Creating Your Own Dream Studio.