Are you ready to produce a podcast from your live show, but you have no clue how to start? Learn more about Ian’s full workflow from podcast to live show and how he uses Ecamm Live and other tools to produce his shows.
In this post, we’ll cover
- How to produce your podcast from your live show
- How you can use Ecamm Live and other tools
- Ian’s full workflow from beginning to end
Watch the full episode
Want to learn even more?
📌 ECAMM LIVE (Free Trial) https://iag.me/ecammlive
📌 IAN’S GEAR GUIDE https://iag.me/gearguide
📌 LIVE VIDEO CONFIDENCE GUIDE (opens with FB Messenger) https://confident.live/subscribe
📌 CONFIDENT LIVE MARKETING SHOW https://iag.me/podcast
Today’s post is all about how to produce your podcast for your live shows.
I will show you my full workflow for I turn my live show into a podcast and blog posts, and how I use Ecamm Live to do it.
Ecamm Live is my favorite live video tool for Mac, and I wouldn’t be here with it. Ecamm Live helps me to produce my podcasts so easily. You can record your audio, sound effects, videos, and guests’ audio all on different tracks. It’s pretty amazing.
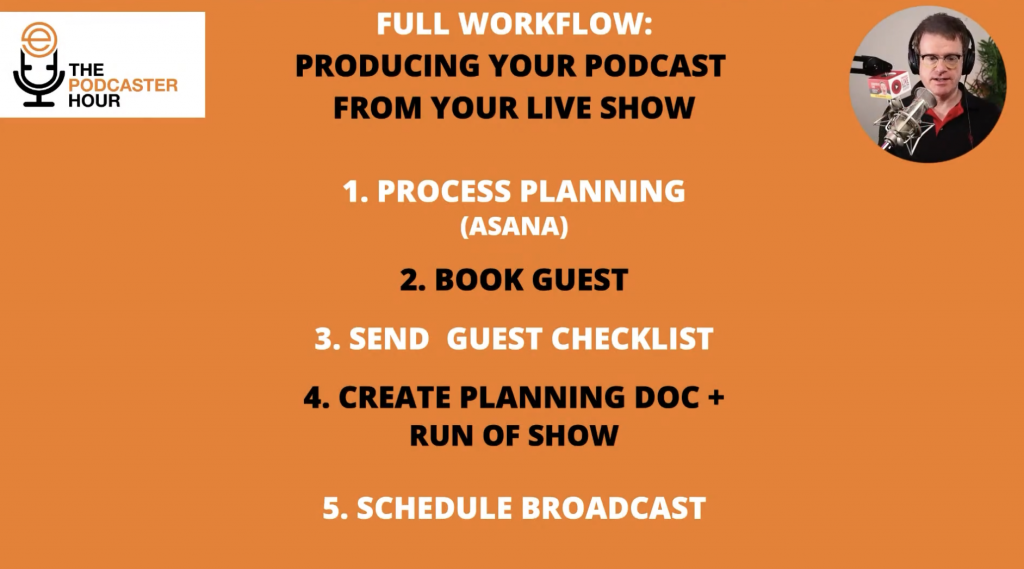
Planning Your Process
The first step in my workflow is planning my process.
I would not be without my process because it helps me at all the different stages. There are so many moving parts in producing a live show, but it’s even more when you add podcasting to the mix.
I like to follow the Five P’s formula, which has all the stages you need to consider for your live shows. The Five P’s formula is:
- Planning
- Pre-promotion
- Production
- Post-promotion
- (re) Purposing
I use Asana as my project management tool. This is totally optional. If you’d rather use an Excel spreadsheet or Google sheets, or a different tool, that is up to you. There are loads of excellent tools out there.
If you have a guest on your show, I think you need to have a really good booking system. Whether it’s for a podcast or a live show, always have a checklist for them to run through. They might not have experience coming on a live show, and yours will be both a live show and podcast. During this time, you can also give your guest some thoughts and tools to present themselves.
Then, create a planning document or run of show to know how the show will be structured. I have a whole episode dedicated to run of show, so while I won’t spend too much time talking about that today, I encourage you to watch the episode or read the recap. After that, you will schedule the broadcast.
I plan my shows in Asana with saved templates and I have each broken down into the five P sections.
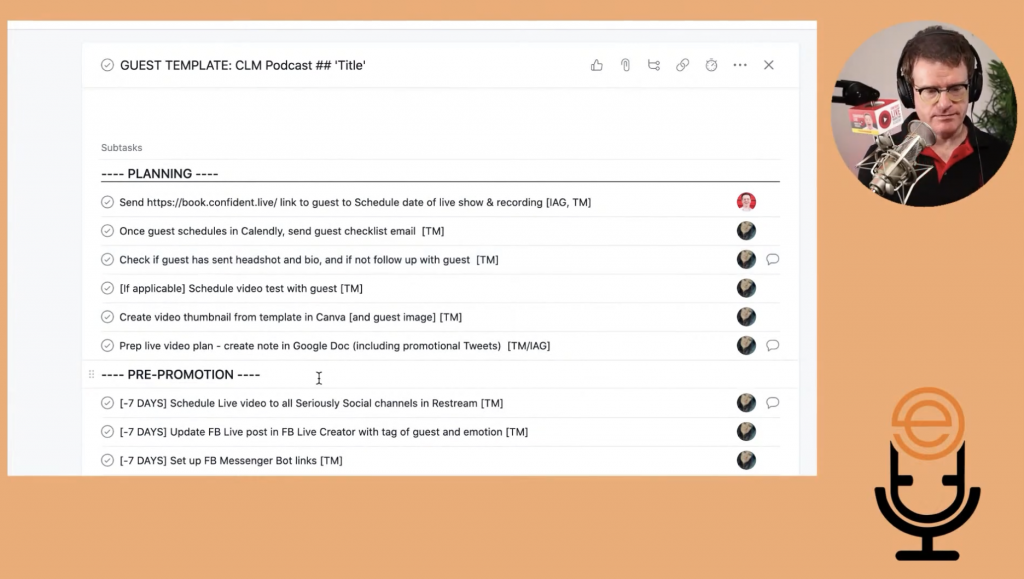
I have a solo show and a guest show template because each one has different stages. For example, if I’m doing a solo show, I don’t need to send out links to anyone else. I do have a team that helps me check off each task, but you can do this independently. I’ve grown my business over the years, and I started as just myself.
If you have an assistant or podcast editor, add them to your project management tool and assign different tasks to them. The main reason why I use Asana is that my assistant forced me to, but I’m actually pleased about that. It’s pretty straightforward and keeps us all on the same page.
Your process is going to be different than mine, and that’s okay. Mine’s quite complicated and lengthy, and I’ve built that up over time.
Booking Your Guest
The second step in my workflow is booking a guest. I use Calendly for that and send the link to my guests to pick a day and time.
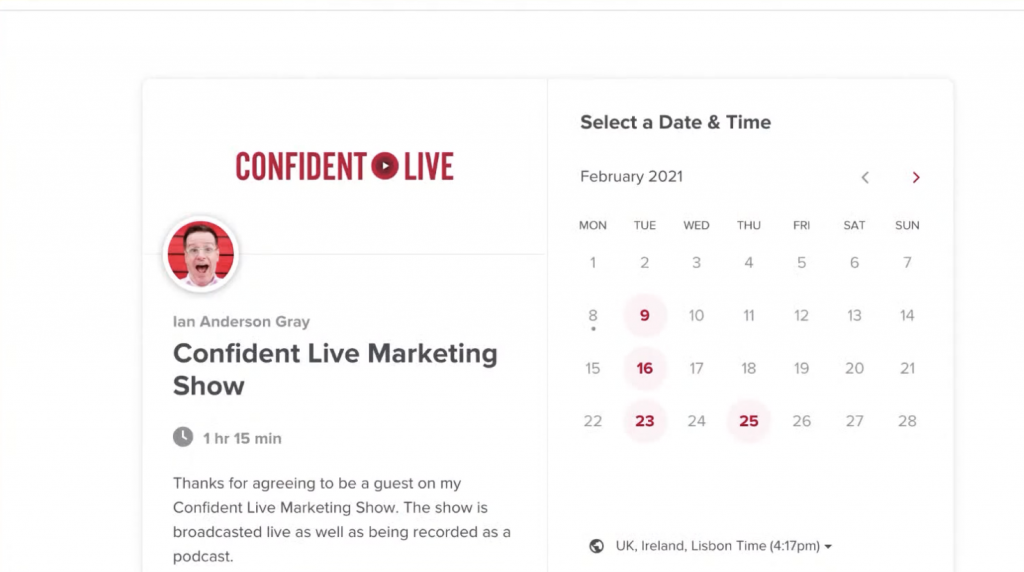
I know quite a few people who use Calendly. It’s a quick and easy way to book time with someone. As you can see in the image, I’ve created one for the Confident Live Marketing Show. If you want to book a show with me, you select a day and time. Then, you add your name, email, headshot, short bio, website URL, and any social handles for me to look at. I also ask what they want to talk about and a fun question about their favorite music genre.
Another great option is Google sheets and forms.
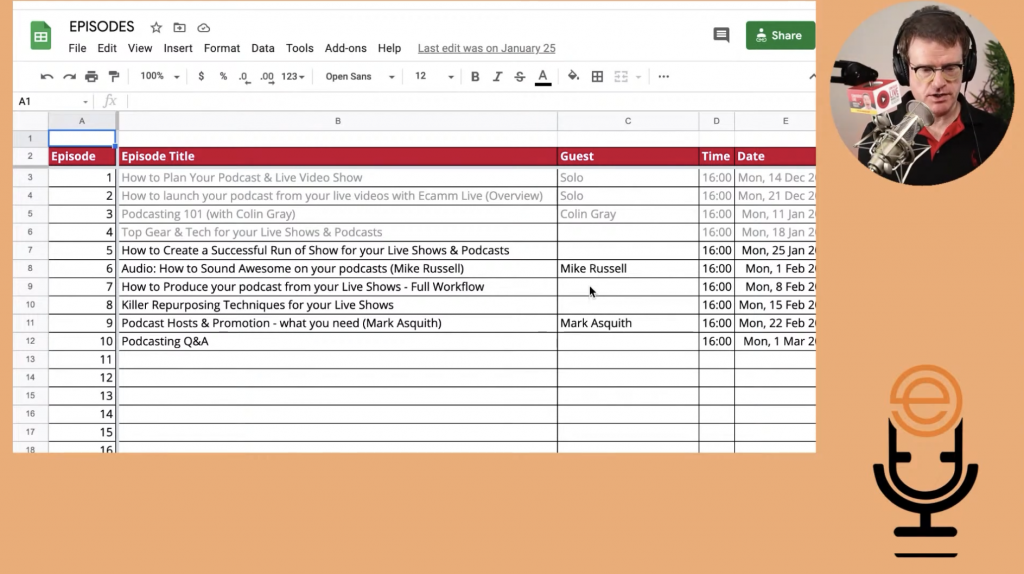
I actually do use Google sheets to track and plan my shows. For The Podcasting Hour, I have a sheet with each episode number, title, guest (or if it’s a solo show), date, and time. For my other shows, I also make sure I always have their headshot, bio, and social handles linked on the spreadsheet.
Guest Checklist
After you book your guest, you want to send them a guest checklist.
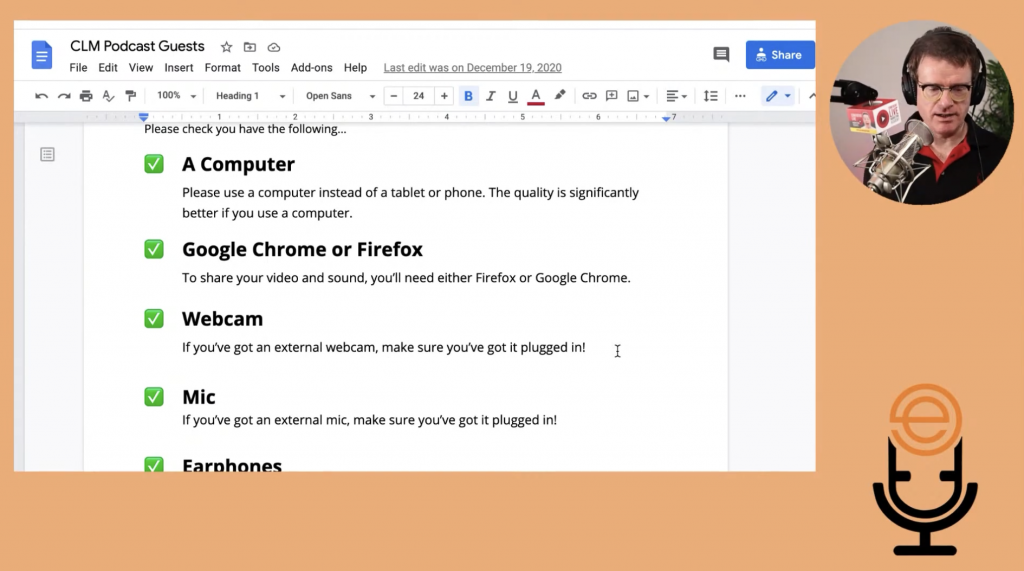
In my checklist, I remind them that we will be broadcasting the interview live, and part of it will be used for an audio podcast recording. Always spell this out because some guests might get confused about what type of show it is.
Then, I link to my podcast page, showing all the videos and podcasts from previous episodes. I also let them know the must-have pieces of tech they need:
- Computer (better experience than a phone or tablet for an interview)
- Google Chrome or Firefox (best quality when compared to Safari or other browsers)
- Webcam
- External mic (ideal; better quality than your computer microphone)
- Headphones (Ecamm Live has amazing echo cancellation, but headphones ensure the best quality sound and no background noise)
Then, I recommend my guest do a speed test to check their internet speed and check how they look on camera. The checklist also goes into more detail regarding lighting, webcams, background noise, etc., to help them a bit more.
On the document’s final page, I give them more information about the show, including what they can expect from the audience. They might not read that far, but I’m giving them the option.
Planning Document and Run of Show
Now it’s time to start planning your show for its particular episode with a planning document and run of show.
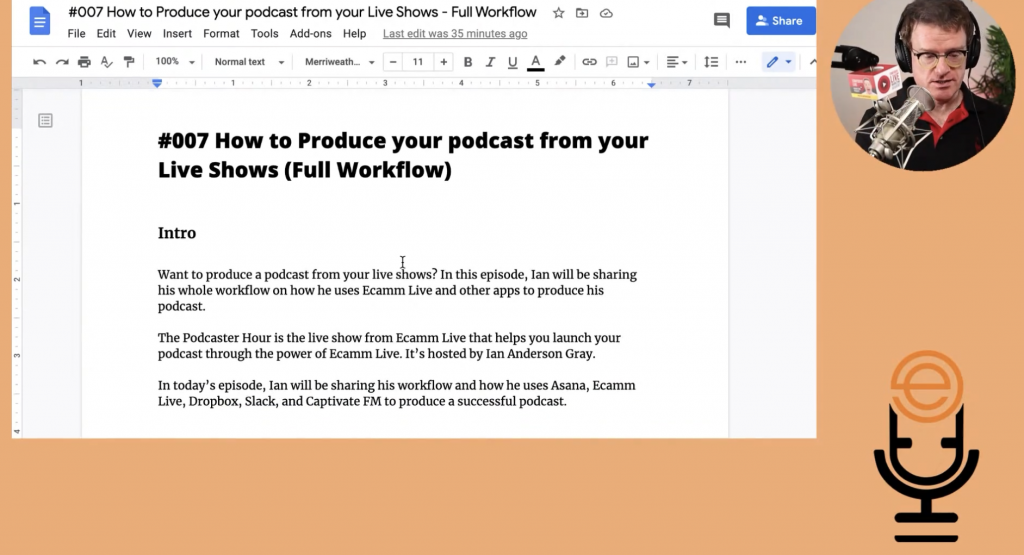
I create a planning document for each episode with the title of the episode and the intro, which is also the blurb or description for our social media posts. It’s easy to create a template and then copy/paste updated information for each episode.
I did mention earlier that I won’t go into too much detail here since we’ve already talked about it, but a run of show is crucial to your live show and podcast. Learn more about it in last week’s episode.
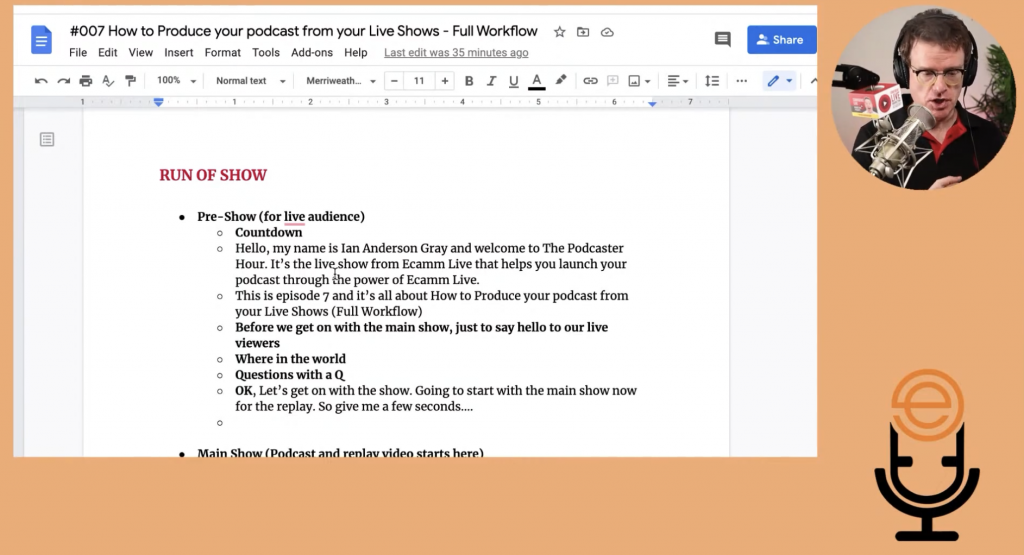
My run of show ensures I structure each episode in the same way. I like to take some of my initial descriptions and add them here. Along with that, I include my pre-show slot that is a specific live show element for my live audience. I also have the hook, intro video, and some basic housekeeping stuff.
Then, I split the show into sections. Section one is the first topic, followed by a reminder of the show topic and asking for live questions. I then go onto sections two and three with the same order. In the end, I remind my guests when I go live next and give my tagline.
I recommend creating a run of show and planning document in Google docs. Another thing I love is using a teleprompter with a remote, so I know what I’m talking about and keeping me on track. I print the run of show doc out as well, just in case something happens to the teleprompter.
Scheduling
After planning out each episode, you will schedule the shows.
It’s really simple to do in Ecamm Live or Restream. You can also schedule your live shows on Facebook or YouTube. I recommend scheduling up to a week in advance, and then you can start promoting the shows on your social platforms. Then, let your guests know you’ve scheduled the shows. Give them a link and ask them to promote it as well. Try to make it as easy as possible for them.
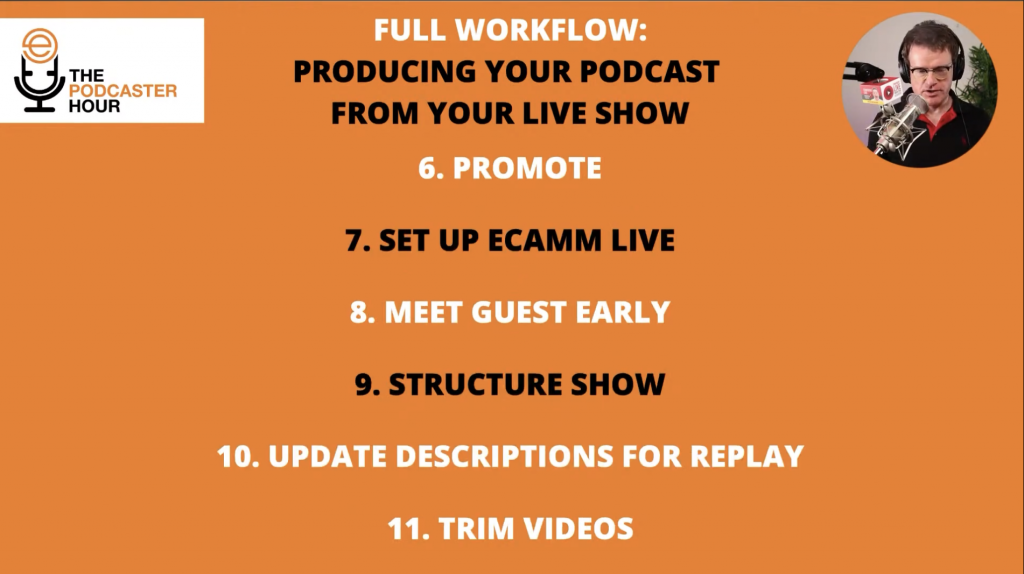
Promotion
Next up in my full workflow is promotion and production.
There are many things you can do here after you’ve scheduled your live events. If you’ve created a Facebook event, you can invite your fans and friends to watch your live show. There are also Facebook messenger bots.
Let people know that you are going live when you schedule. I like to give them a way to subscribe to a calendar, so they know when your live shows and podcasts are coming out. I use Agorapulse for social media scheduling and Add Event as a way for them to subscribe to a calendar. And, don’t forget about email lists. I also like to use Sendtric, which allows you to embed countdown timers in your emails.
Your goal here is to create a buzz around your live show and build up your community and audience.
Setting Up Ecamm Live
Now let’s take a look at Ecamm Live.
I’m not going to go into everything you need to do to set it up because there are plenty of tutorials that can help you with that. But, you need to create all your different scenes for your show, especially if you plan to have guests on your show. For podcasting, it’s also important to set up the ISO audio tracks.
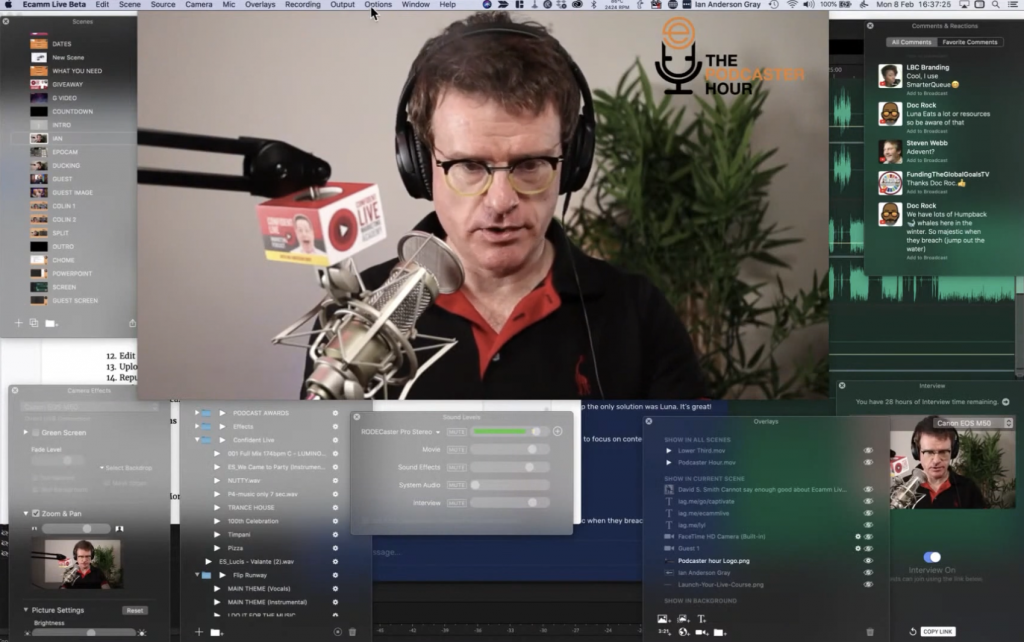
Here you can see the live demo mode for Ecamm Live. If you go into preferences, there are a number of things to think about for streaming, video, audio, and more.

In audio, I can check and record isolated audio tracks. If you have a guest on your podcast, you want to separate your track from theirs. You can add pre-recorded sounds, and you can switch on high-quality audio mode, which I do because it records a higher audio bitrate.
You can also choose your recordings folder. This is where Ecamm saves your recordings, and I like to save mine in my Dropbox folder. If you use Google Drive or iCloud, I recommend saving it there so you can share it later on to your assistant or podcast editor (if you have one) and always have access.
Also, always test your audio and video first before going live. There are loads of features here you can play around with and get comfortable with.
Meet Your Guests Early
This is very important. I would recommend meeting your guests 15–20 minutes early to test audio, video, lighting, etc., and make sure everything is going okay.
Then, it’s time to go live.
Structure Show
I’ve shared this before, but I like to have a countdown on the screen and an informal live element. This is part of my pre-show, and it’s just to interact with my live audience. It’s not part of the actual podcast. Then, I’ll play the show intro and the actual show, which is the replay and podcast section. After that, I play my outro. At this point, you have two choices. You can end the show there, or you can have an optional live element at the end that won’t be a part of the podcast.
During the live show, you will broadcast all of the tracks, which are then saved in your Ecamm Live recordings folder. You can then update your social media descriptions from where you’ve gone live and cater them more toward your replay audience. I also think it’s important to go back to YouTube, LinkedIn, and Facebook, if you’re broadcasting to those places and trim those videos.
You can use many tools to edit your videos, and one of my favorites is Descript. With Descript, you just add the recording, and you can edit the video or audio. You can cut bits out, create transcriptions or fancy captions. Lots of fun features there.
Editing Audio for Podcast
In this step, I edit my live show audio for my podcast using Ecamm Live.
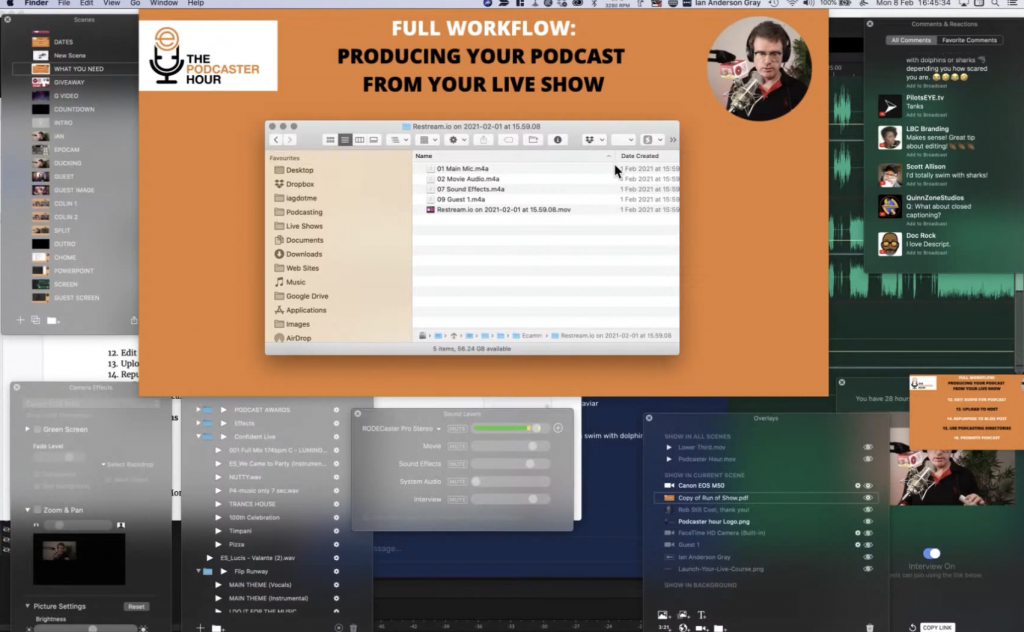
First, I find my saved records. Here you can see I have a folder open for a saved recording from Restream. There are four separate audio tracks and a video track for the entire episode:
- Main Mic
- Movie Audio
- Sound Effects
- Guest 1
Then, I open Adobe Audition.
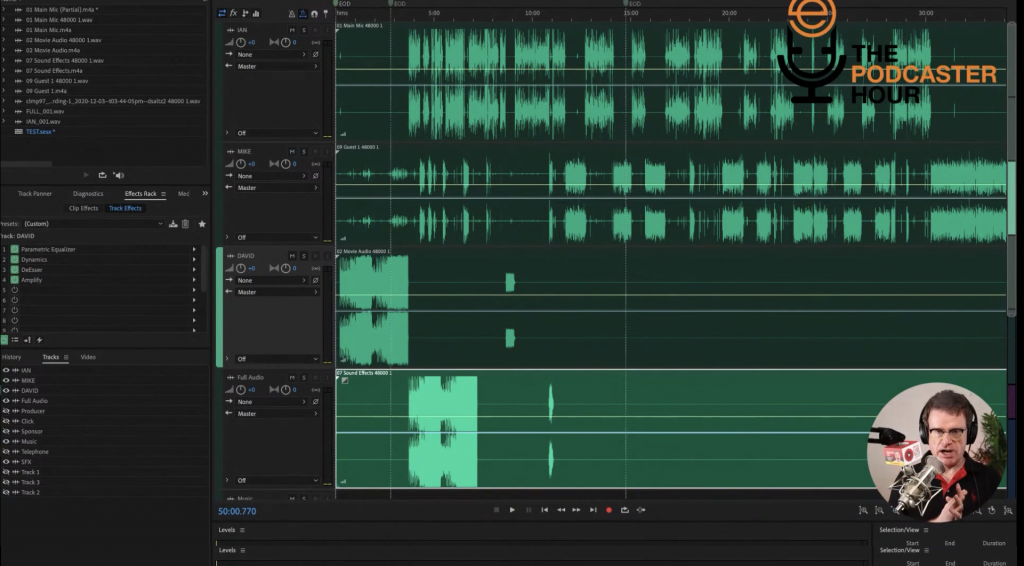
If it looks a little scary to you, don’t worry; it’s not as scary as it looks. If you don’t want to learn how to use Adobe Audition, you can also try out Audacity, a free tool, or Alitu.
What I’ve done here is I’ve dragged my audio tracks into the program. The top track is Mic 1, followed by the guest track, video, and sound effects. Now, I can edit little bits out if needed, such as any annoying background noises. I can also adjust the audio like Amplitude and Compression to normalize the audio or update the dynamics.
I also check the average amplitude to make sure it’s at the right decibel level and adjust the auto gates. There’s a compressor feature to compress sound; you do not want a huge distinction between loud and quiet noises. You can tweak the settings as much as you need to.
Once you finish editing your audio, you’ll export the final section. Then, drag the file into the Match Loudness section to ensure the audio is not too high. I keep mine at -12 LUFS. I also like to add metadata bits, such as the title and my name. The information will be embedded in the MP3 that you get once you save. I won’t go through all of the steps because there’s a lot you can do.
Remember, you don’t need to do this all yourself. You can always hire a podcast editor or use a more straightforward tool.
Upload to Host
Now it’s time to upload your podcast and I use Captivate FM as my podcasting host.
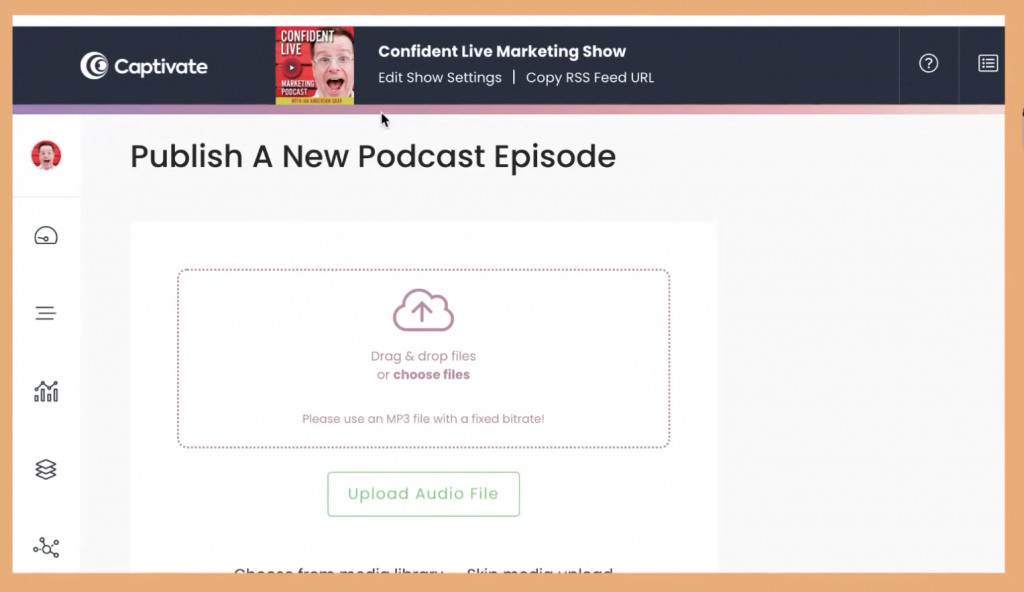
Captivate allows me to create a new show and a podcast feed that goes to iTunes, Apple Podcasts, Spotify, and all the other places people can listen. I upload the audio file, add the title, subtitle, show notes, and other details. You can then publish the podcast immediately or schedule it for a later date.
Repurpose to Blog Post
During this step, you can repurpose to a blog post. I’ve talked about this more in another episode, along with other killer repurposing techniques, so be sure to check that out. You can also embed the podcast onto your blog by adding the HTML code for the player into the post.
Use Podcasting Directories
I’m a big fan of Podchaser, which is like the IMDB of the podcasting world.
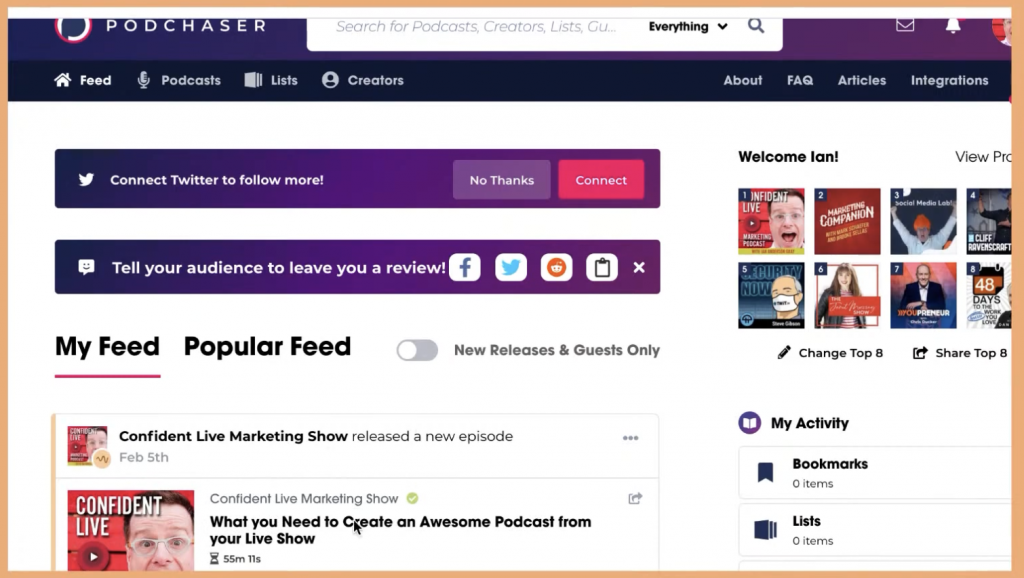
I have a feed for the Confident Live Marketing Show and every new episode shows up here. You can easily link your episodes to Podchaser and add guests from your show as well. For example, I can view all of the guests I’ve had and search for specific episodes.
Finally, it’s time to promote your podcast. Again, you can use social media management tools, email lists, Facebook ads, etc. We’ll talk about this more in a couple of weeks on a different episode, but there is so much you can do.
It may seem like a lot of work, but it’s worth it in the long run. Now that I’ve done this workflow for so long, it goes by pretty quickly. I suggest learning how to edit yourself and practicing this workflow, and then bring on an assistant or podcast editor when you can. And, of course, Ecamm Live is here to help you every step of the way.
We’re here to help!
Wherever you are right now, you’re not alone, and we’re here to help. You can watch all episodes of The Podcaster Hour on YouTube and leave us any questions that you have in the comments.
Or…
Join the Ecamm Live Community to network with other live streamers like you, grab Ian’s live streaming and podcasting gear guide, and try out his live video confidence guide.
And if you need another podcast to listen to, may we humbly recommend the Confident Live Marketing Show.