Today, we’re going to go through some simple lighting techniques that can help take the quality of your live stream to the next level. In this post, I’ll cover things like color temperature, how to position your lights, and then I’ll show you the lights that I use and recommend.
Quick Links
- Try Ecamm Live for FREE: https://bit.ly/3fw8N8r
- Neewer 480 Bi-Color LED Light (Single Light): https://amzn.to/3bBxfUA
- Wellmaking U-Shaped Tilt Adapter Swivel Mount: https://amzn.to/2R3rHJ6
- Neewer 480 Bi-Color LED Lights (2 Pack with Light Stands): https://amzn.to/2FfyPPT
- Softbox for Neewer 480: https://amzn.to/3jWc82C
- Neewer 660 Bi-Color LED Light: https://amzn.to/3ibuImI
- Barn Door for Neewer 480: https://amzn.to/3jTD2Im
- Neewer T-100: https://amzn.to/3235gdA
- Mini Lightstand for Neewer T-100: https://amzn.to/3235gdA
- ESDDI Video Light: https://amzn.to/3jRpZHi
- Batteries for all above lights (NP-F550): https://amzn.to/3i8Br0z
- Godox SL60Y (Yellow Version): https://amzn.to/2F9eYlJ
- Godox SL60W (White Version): https://amzn.to/2F8Ag2Z
- Softbox for Godox Lights: https://amzn.to/338N29X
- Heavy Duty Light Stand for Godox Lights: https://amzn.to/2Zevqbi
- Ceiling Mount: https://amzn.to/3lYmDUM
- Drywall Anchors: https://amzn.to/323Ognm
- Articulating Light Stand Mount (for ESDDI Video Lights): https://amzn.to/325kEWH
- Sandbag for light stand (sand not included): https://amzn.to/3m0Hpmu Matthews Baby Stand Extension Pole: https://bhpho.to/3bxdxtr
- Elgato Key Light: https://bit.ly/2EZ3MIG
- Elgato Key Light Air: https://bit.ly/2ZbHH0o
Lighting is everything.
When it comes to visuals, lighting may be the single most important element. Even more important than the type of camera that you’re using. After all, having a great camera doesn’t guarantee you a great shot and having a webcam doesn’t guarantee you a bad shot. It really comes down to effective lighting techniques. This means that getting good lighting techniques down early can help you save you a bunch of time frustration and money.
But before we dive into lighting, make sure to take time to really assess your space because your background will influence how you light yourself. They really go hand in hand.
Think Feng Shui.
Everything should be balanced and in harmony. If you haven’t already, definitely check out the video set background tips video by Luria Petrucci. She gives tons of tips and ideas about how to create a great background for your live stream.
But it’s not as easy as emulating somebody else’s background or even creating your own. You have to realize that lighting will have the largest impact on your set and your videos. So you need to be intentional about the mood and ambiance that you’re trying to create. I’m going for more of a warm, cozy, earthy, inviting feel.
Whether you paint a wall, add some fake plants, or shelving, hang some artwork, set up some color lights, or anything else, it’s better to figure that all out before you jump into lighting. That way, you’ll keep your lighting consistent and make sure it meshes well with your background. Remember that you’re creating an experience for your viewers, you’re inviting them into your space. This is the same thing, just online.
Color Temperature
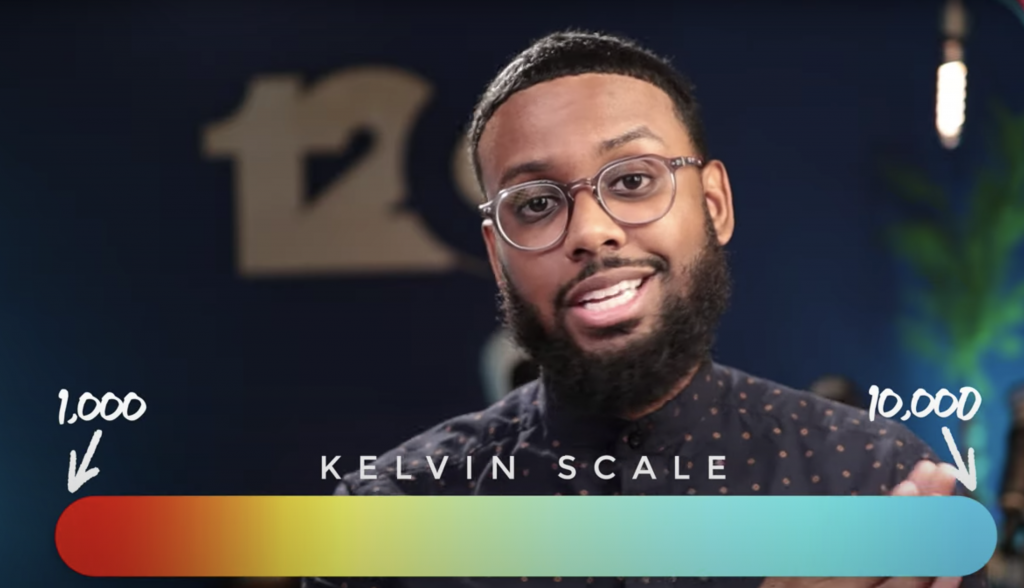
Color temperature is actually pretty simple. Light is measured on a Kelvin scale between 1000 and 10,000 with the low end being closer to a red and a high end being closer to a blue. When it comes to man made lights, specifically lighting for video and photo, we tend to stick between 3200 to 5600, with 3200 being closer to like a warm or amber white and 5600 being closer to daylight.
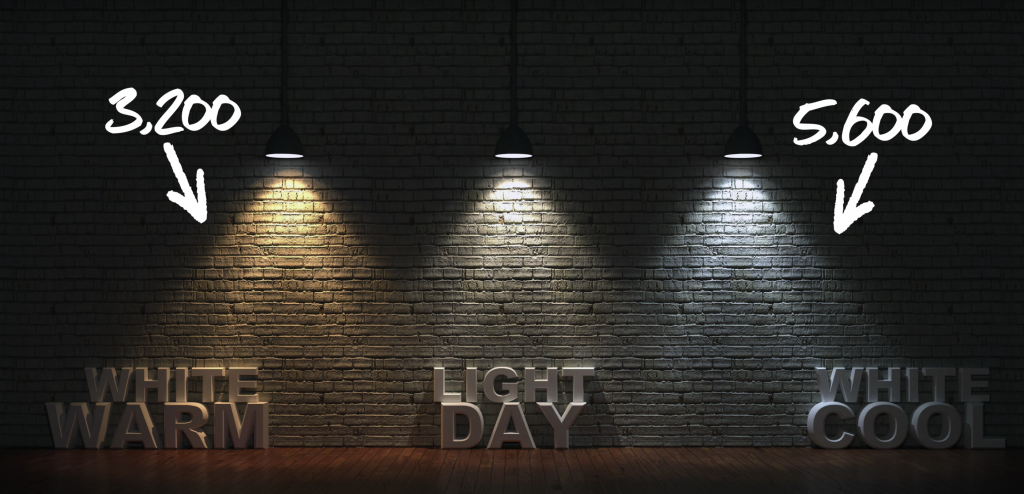
This is helpful because if you have different lights and bi-color lights, it’s best to keep the temperatures as consistent as possible to create the most pleasing look unless you’re doing something special like using RGB lights and you want one side to be blue and one side to be red. If not, keep the temperatures as consistent as possible.
Now that we have the basics out of the way, here’s a quick tip.
Turn Off Your Existing Lights
I found that it really helps if you turn off any pre-installed lights in your room. If you’re in a home office like me, you may have a ceiling fan or some other type of light directly in the center of your room. That light is really meant to illuminate the entire space, but sometimes that can do more harm than good and really ruin your shot. Just turn it off. Start with a clean slate and strategically start adding your lights one by one to create the look that you’re going for.
Three-Point Lighting
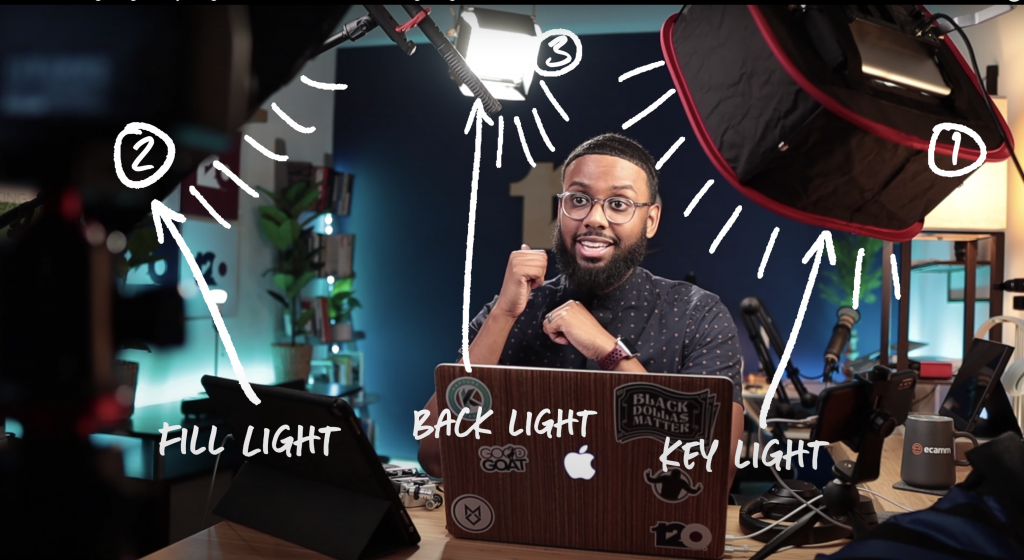
So the general guiding rule of lighting is three point lighting. This means that you have:
- A key light
- A fill light
- A backlight or hair light
Your key light is your main light or your brightest light source and it’s meant to give you the most light into your shot.
Your fill light is really meant to fill in the shadows on the other side of your face. So the general rule of thumb is to set it at about 50% and this helps to add depth to your face to make it look less flat.
Your backlight or hair light helps to illuminate the top of your head to separate you from the background.
Marshall’s Light Recommendations
Here are some of lights that I use and recommend for live streaming. The main lights that I use are Neewer bi-color 480 LED lights. Bi-color meaning two temperatures, but they make it really simple and just say yellow or white. You can adjust the intensity of each and mix and match to find the perfect temperature.
Neewer also has a set called the 660s, which are a bit larger, have more LEDs and come with barn doors. They’re overkill for my setup because I have the lights close to me, but if you’re going to have your lights a bit further back, you may want to consider those.
Another light that I really love is the Neewer T100. It’s small and lightweight, so you can move it around and even mount on your camera for vlog type stuff. Finally, I love the ESDDI video lights. They’re pretty small and you can use them as a backlight or hair light.
My main light for filming tutorial videos like the one embedded in this article is the Godox SL60Y. The “Y” stands for yellow. They also have the 60W for white.
For key lights, Elgato makes regular key lights and a smaller version that they call the Key Light Air. They either mount to your desk or stand on your desk and you can control the temperature and intensity from the app.
How to Set Up Your Lights
Here are a couple of ways that you can set up your own lights. If you’re just starting out, the easiest way is just to use light stands. Start with one light positioned to the side of you. I have mine at an angle because I like the look and, in this position, there is no reflection on my glasses and then have your fill light on the other side. Remember, the rule of thumb is to have it a bit further back or at about 50% intensity. That’s where you’ll start. Adjust accordingly based on your specific needs, tastes, and situation.
Once you have your foundation set, feel free to move your lights up and down, back and forth until you find the right look. I have a backlight in my studio that is mounted to the ceiling, but you can have yours on a light stand or just out of frame. If you decide to use mounts, just make sure you use drywall anchors to keep them secure. You might also want to add a light stand extension pole.
Another thing to consider adding into your lighting is a soft box, which gives it a softer light.
So that’s it. The most important thing to remember is that this is just a list of general principles. Use this as a guide, not gospel. What I love about live streaming — really video content creation in general — is that it’s okay to break the rules. It’s okay to experiment and try new things. Just have fun. You don’t have to follow every rule to a tee. This isn’t my first setup and I guarantee you won’t be my last.
So my recommendation is if you’re just starting out, just focus on getting some lights first, definitely some bi-colors. Make sure you look flattering to you. Then focus on more advanced lighting techniques. And don’t get overwhelmed by all the lights. Just use what you have until you can slowly upgrade.