You already know that Ecamm Live can help you create professional live stream broadcasts, but did you know that you can also use Ecamm Live for recording videos? That’s right – Ecamm is not just for live streaming!
In this post we’ll cover
- How to use Ecamm’s record only feature for recording videos
- When and why to create recorded videos versus live streaming
Watch the full episode
Go LIVE Now! is a weekly live video show hosted by Luria Petrucci of LiveStreamingPros.com. You can catch new episodes each week on Facebook and YouTube.
Want to know what gear Luria is using? Check out the full Go LIVE Now! gear guide.
Do you want to record video and go live? Well, did you know you can do it all in the exact same software setup? It’s true!
You don’t have to have a completely different studio for live streaming and recording videos. You can use the same equipment AND software to accomplish both. That’s what we’re going to talk about today.
The thing that most people don’t realize is that you have all the capability you need in Ecamm Live. You can live stream AND you can create recorded videos. You can really get a tremendous amount of use out of this software.
Recording videos vs. live streaming
There are lots of kinds of videos that you may want to create within Ecamm Live without going live. Videos like courses, sales videos, Facebook ads, promo videos, and webinars… just to name a few.
In fact, at Live Streaming Pros, we have quite a few clients who use Ecamm to create webinar videos, like Michael Hyatt and Amy Porterfield, for example.
Ecamm gives you every capability to add graphics, logos, run through presentations, and more – in the same way you would if you were live. And you can seamlessly just jump back and forth between everything so that you give your viewers the best possible experience. After all, we’re all visual learners, right?
With Ecamm, you can go back and forth between different overlays, different graphics, show things on screen… and this is going to help you give your viewers the opportunity to learn and absorb the information that you are teaching much better.
Want to know how to use all aspects of Ecamm? Check out Luria’s training course at www.livestreamingpros.com/ecamm
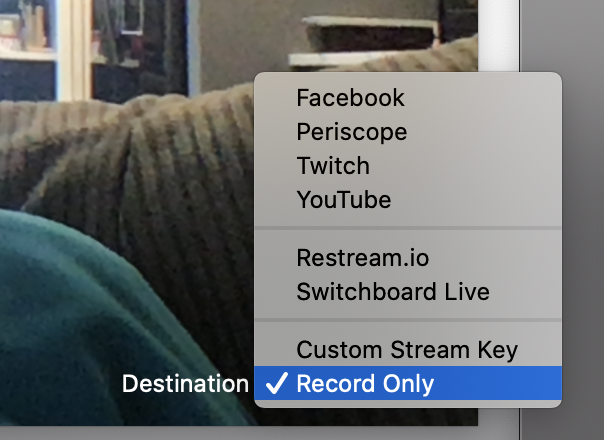
OK, so if you’ve never used Ecamm before, you can find the record only feature in the destination menu at the bottom of the main window.
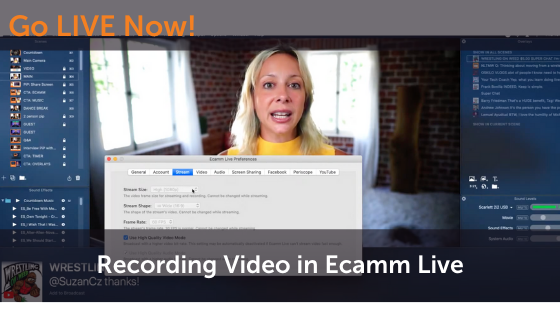
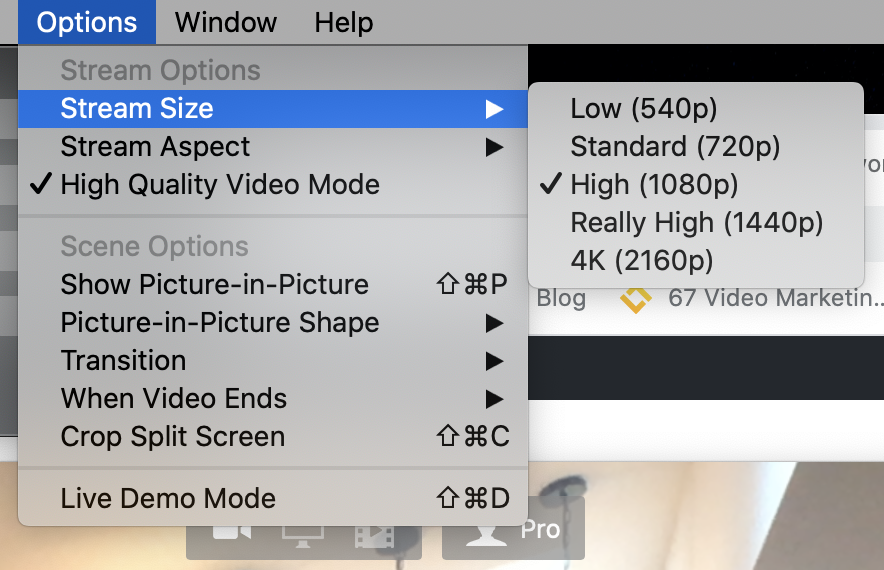
Once you’ve selected that and BEFORE you click to start recording videos, you’ll want to choose your video quality. To do that, go to the Ecamm Live menu at the top and choose Options and then Stream Size. It’s within this menu that you can select what quality you want to record in.
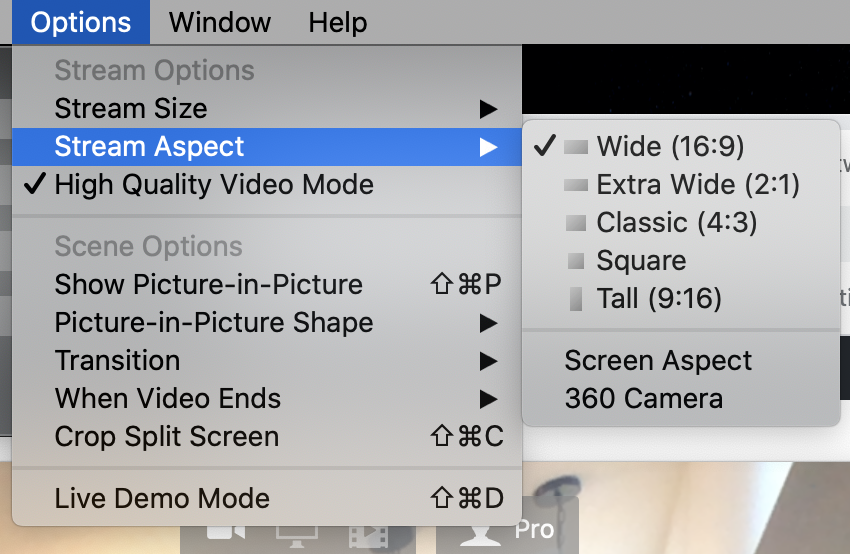
In the same Options menu, you can also select your stream aspect (which is the shape of your broadcast.) This is helpful if you’re recording a video that you plan on releasing as an Instagram post, for example. In that case you’d want to select the square shape.
You can decide what works best for you, but I record all of my videos in 4K because I do a lot of zooming in and this helps make sure we don’t lose any video quality.
I also used to do what’s called “live to drive.” When I started in video, it was called live to tape because we actually used tape in our cameras. What that meant is that you actually just go and speak and act as if you were live. No stopping. No backing up and doing it again. If you mess up, you mess up and just keep going. That’s live to drive. Now it’s just live streaming. That being said, it’s a great way to approach video creation in Ecamm Live. Even if you’re not live and you’re using the record-only option, you can still have the mindset of being live.
The bonus is that you never have to edit it. How awesome is that?
If you’re feeling a little nervous about that concept, I will point out that Ecamm Live record-only has a pause button. So you can pause if you need to and then continue on when you’re ready. I love this feature so very much. I use it all the time. So when I’m recording my YouTube videos, I use the pause button so that it makes it easier for my editors. If I need to stop and think what’s next, I just hit pause and then when I’m ready to go, I pick it back up again. It couldn’t be easier! Just don’t forget to hit that resume button when you’re ready to start talking again.
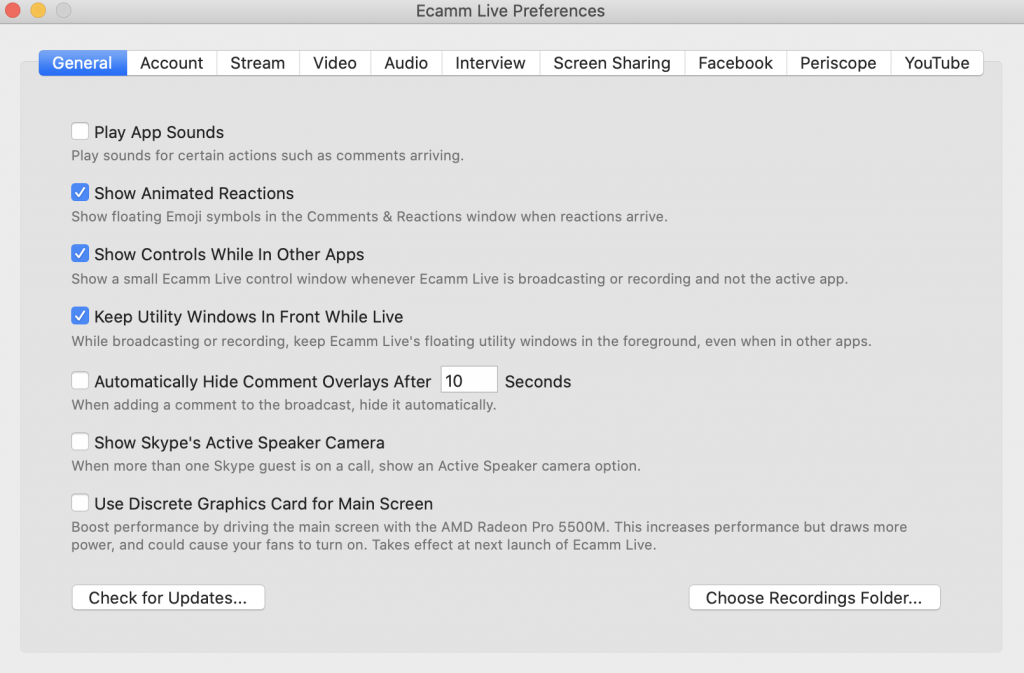
Another important thing to know is that all of your recordings (whether you’re live or recording a video using Ecamm) go into a folder on your Mac and you can choose the recordings folder.
To choose the folder, go into the Ecamm Live menu and choose Preferences and then select the General tab and then choose the recordings folder at the bottom. Like this:
Bonus: if you have no idea where your files are going, Ecamm will trigger a pop-up when you’re done shooting your video that says “view file” and it’ll take you right to your finished video! Or you can automatically send it to YouTube.
I store all of my Ecamm recordings on Google drive so that they can be edited and processed and I made sure to pin that folder in Finder so it’s easy for me to find and access anytime.
So I’d encourage you to not only live stream with Ecamm, but use Ecamm for recording videos from promos to trainings to ads and more. You’ll be amazed at how versatile this tool really is!
We’re here to help!
Wherever you are right now with your business, you’re not alone and we’re here to help. Go LIVE Now! is a weekly live show on YouTube and Facebook. If you join us live, you can ask your questions at the end of each episode. If there’s a subject you want us to cover, let us know in the comments below.
Want to learn more about Ecamm shows? We have lots of amazing shows to choose from so you can take your live streaming to the next level.
Or…
Join the Ecamm Live Community to network with other live streamers like you.
Snag some free Ecamm Live training with Luria.
Get help from the Live Streaming Pros in Creating Your Own Dream Studio.

