Want to add professional animated lower thirds to your videos? We’ve got your back.
In this tutorial, Ecamm Live expert and graphic designer, Marshall Fox, walks you through how to use Motion to create professional-quality animated lower thirds and overlays to use in Ecamm Live.
Get ready to step up the quality of your live stream and produced videos.
This tutorial uses an app called Apple Motion. It costs $50 USD. You can grab your copy of Motion right here.
Watch the Video
Before we dive in, it’s worth noting that this is an immediate tutorial. We’re going to be using Apple Motion templates in this tutorial, so be sure to grab your copy before jumping in.
We’re not going to be doing anything from scratch and you can get these kinds of templates from places like Motion Array or Video Hive. The template that I’m going to use today is from Envato Elements.
So the first thing that we need is a template to start from.
So let’s head over to Envato Elements, one of my favorite places online. We’re going to select video templates from the top. Let’s search for lower thirds.
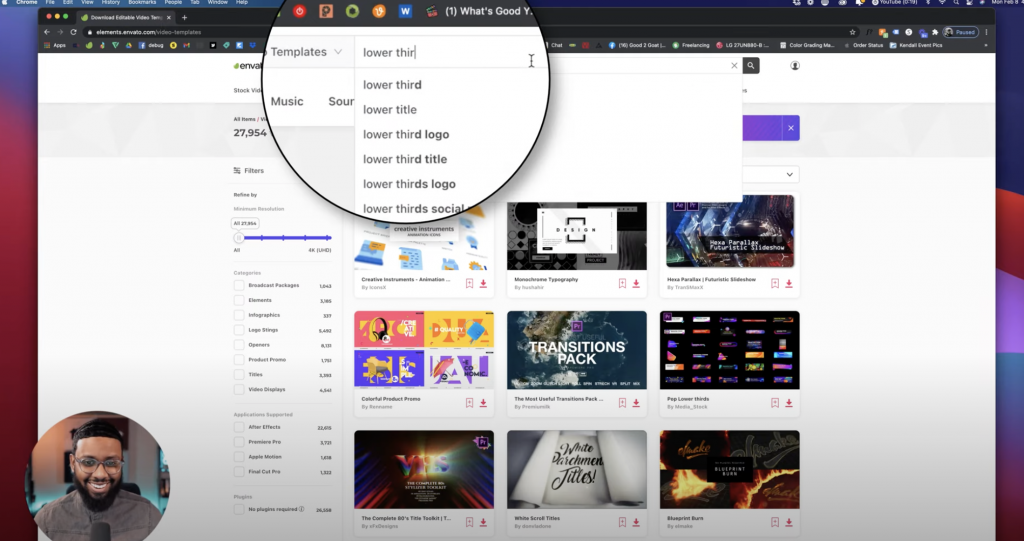
All right, go down to the left-hand side and let’s filter this list and only show Apple Motion. If you have Final Cut Pro, you can check that off. But a lot of those are the same, to be honest.
So they give you tons of different packs to choose from and you can preview them. Once you’ve found one you like, download it and grab the license.
You can save it to your downloads folder and then unzip it.
So the good thing is all of these packs come with instructions. Sometimes it’s just a PDF. Sometimes it’s a PDF and a movie, so you can take a look at it. So just read the instructions and that’s it. We’ll see you next time…
Nah, I’m playing. 😂
So if you only have Final Cut Pro installed and not Motion, you’ll want to install it in this location. But if you have both Motion and Final Cut Pro or just Motion, you want to install it here.
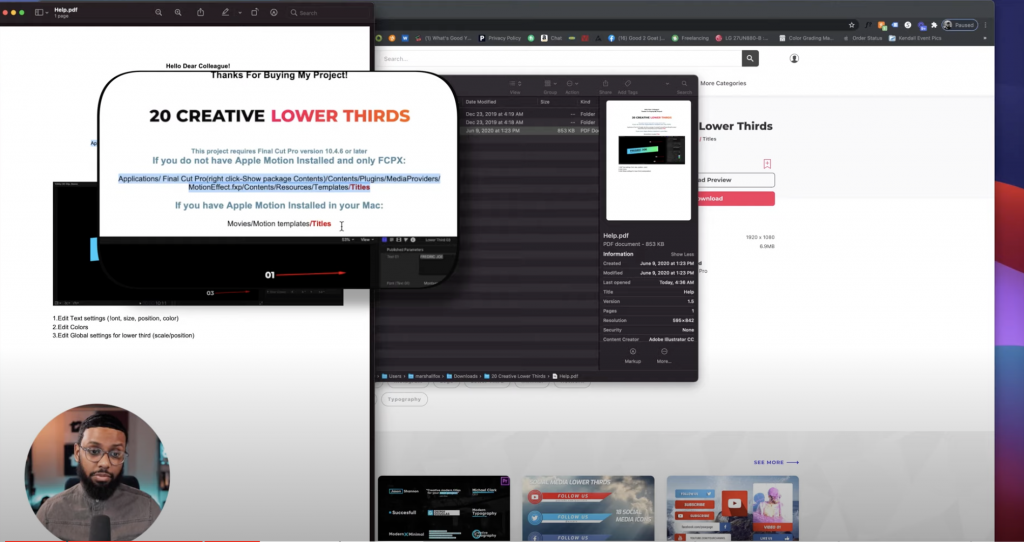
So what I’ll do is type in Motion templates in Finder and I have to drag this entire folder inside of the Titles folder.
See all of the 20 creative, lower thirds? Drag that inside of Titles. Once I do that, it’ll be all set. Close it and reopen it. And then go ahead and open up Apple Motion.
On the left-hand side, just look for the title of the folder that you just dragged into the Titles folder.
Select that and scroll down to one that you want to use. Click on it and click open. All right. You can press Space Bar on your keyboard to play it. And the good thing is this animates out as well. So it’s just playing on a loop. What I want to do is up at the top left it’s on library by default, you want to click inspector, so this will show you the things that you should be changing.
I want to change this Marshall Fox – Content Creator.
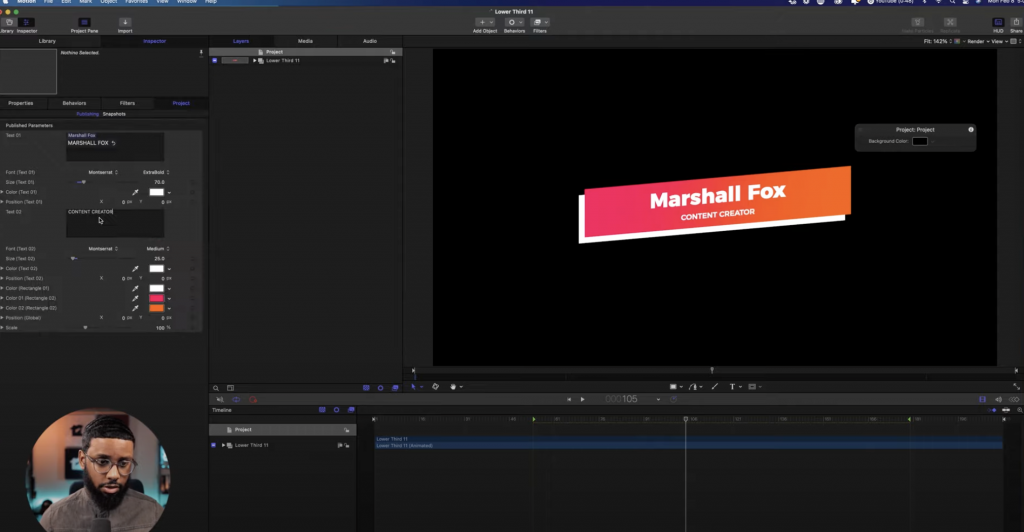
It was in all caps originally, but that’s fine. It’s easy to change that. It has a nice grading here, but I want to change this to my colors. I just pull up my style guide and copy the HEX codes to drop into this so that it applies my brand colors to this design.
Excellent. Let’s good to me. I actually make this a little darker. There we go. I like that better.
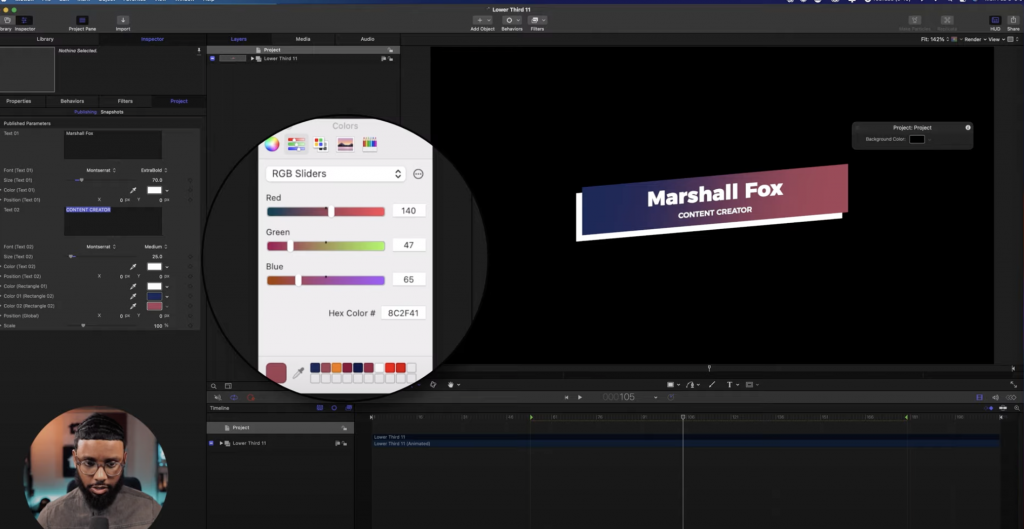
Yeah, that looks good. All right. So don’t forget this step. We have to position this in the lower left corner or wherever you want to position this lower thirds on your video. So you’ll want to come over here where it says position global and you’ll want to tweak these. So I’m just moving it over,
Just adjust to X and Y values. And you can also make it a bit smaller by using this scale slider. Okay. Or larger I think I like it about this size. No, just move it over some and we’ll be down some.
I think that looks good. So now we’ll export it. So I’ll come over to the top right. Click share and then click export movie. The good thing is when you download these templates, especially for Motion. They’re already in the right format. Right? So as you can see, we need it to be an .mov file. Down here it says .mov.
So we’re good there, but let’s just double check the settings. It’s 1920 by 1080, which is fine. Video and audio. That’s cool, but it’s no audio. We’ll just leave that. Color channels, color plus alpha. Alpha is the transparency. So that’s exactly what we want. Render. We’ll just leave all that the same, then hit next.
Saved as downloads. So we’ll just do Marshall Fox lower third. Export out.
Boom. There it is. So when you play it you’ll have a black background, but when you drop it into Ecamm it won’t. So you can bring your overlay into Ecamm in one of two ways you can just drag it in from the finder. There it is. I like the placement of it, or you can select the new animated overlay button in the overlays panel and select it that way.
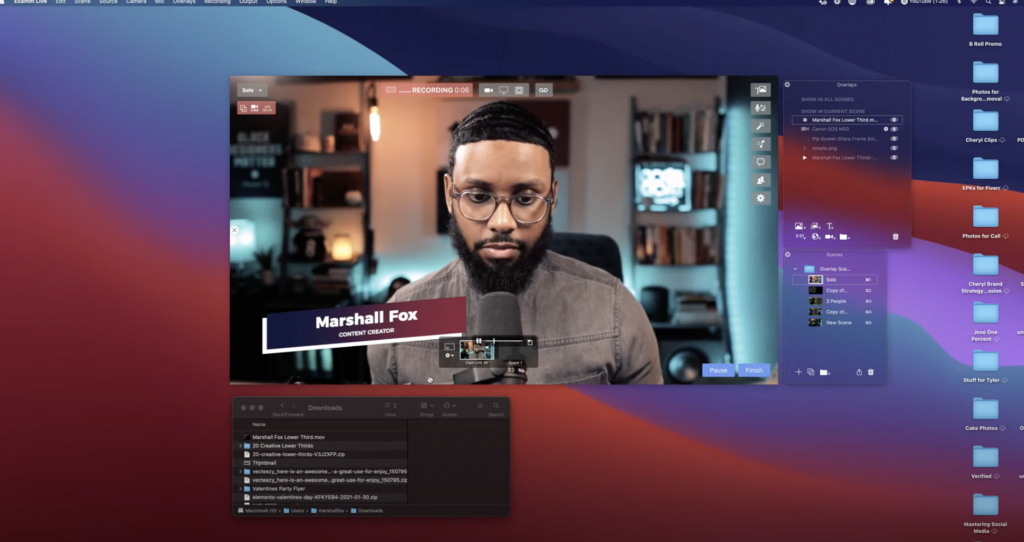
So either way, it’s up to you. So what I like about this is you can select different playback options. Of course you want it to auto play, but when finished you can have it, do nothing, hide, or loop.
Looping is probably not ideal for a lower third, but would be great for other animations. Just remember to select what you’d like it to do.
You can use this same technique for lower thirds, titles, and transitions.
Want to practice in a safe space? Come hang out with us in the Ecamm Live Community. We’re there to answer your questions and help you get up and running with professional live streaming and video production.